Here’s a Finale Refugee’s travelogue through Dorico while writing a jazz big band arrangementrefers to the structure and order of musical elements in a composition, such as melody, harmony, rhythm, and instrumentation.. Here’s the end result for our first project:
(Announcing Doricotuts.com – )
We put up a website to help users with the transition to Dorico!

Translation Glossaries for Finale refugees
The terminology and operations vary in many ways between Finale and Dorico. Notea symbol used to represent a specific pitch and duration the references to Panels – those are also available as “Popovers,” summoned by ⇧[letter] or via the Jump BarA line that separates measures in sheet music., which can function like an in-app search. Here are a couple of tables that many users have found helpful. Note that some items are only available via panels.
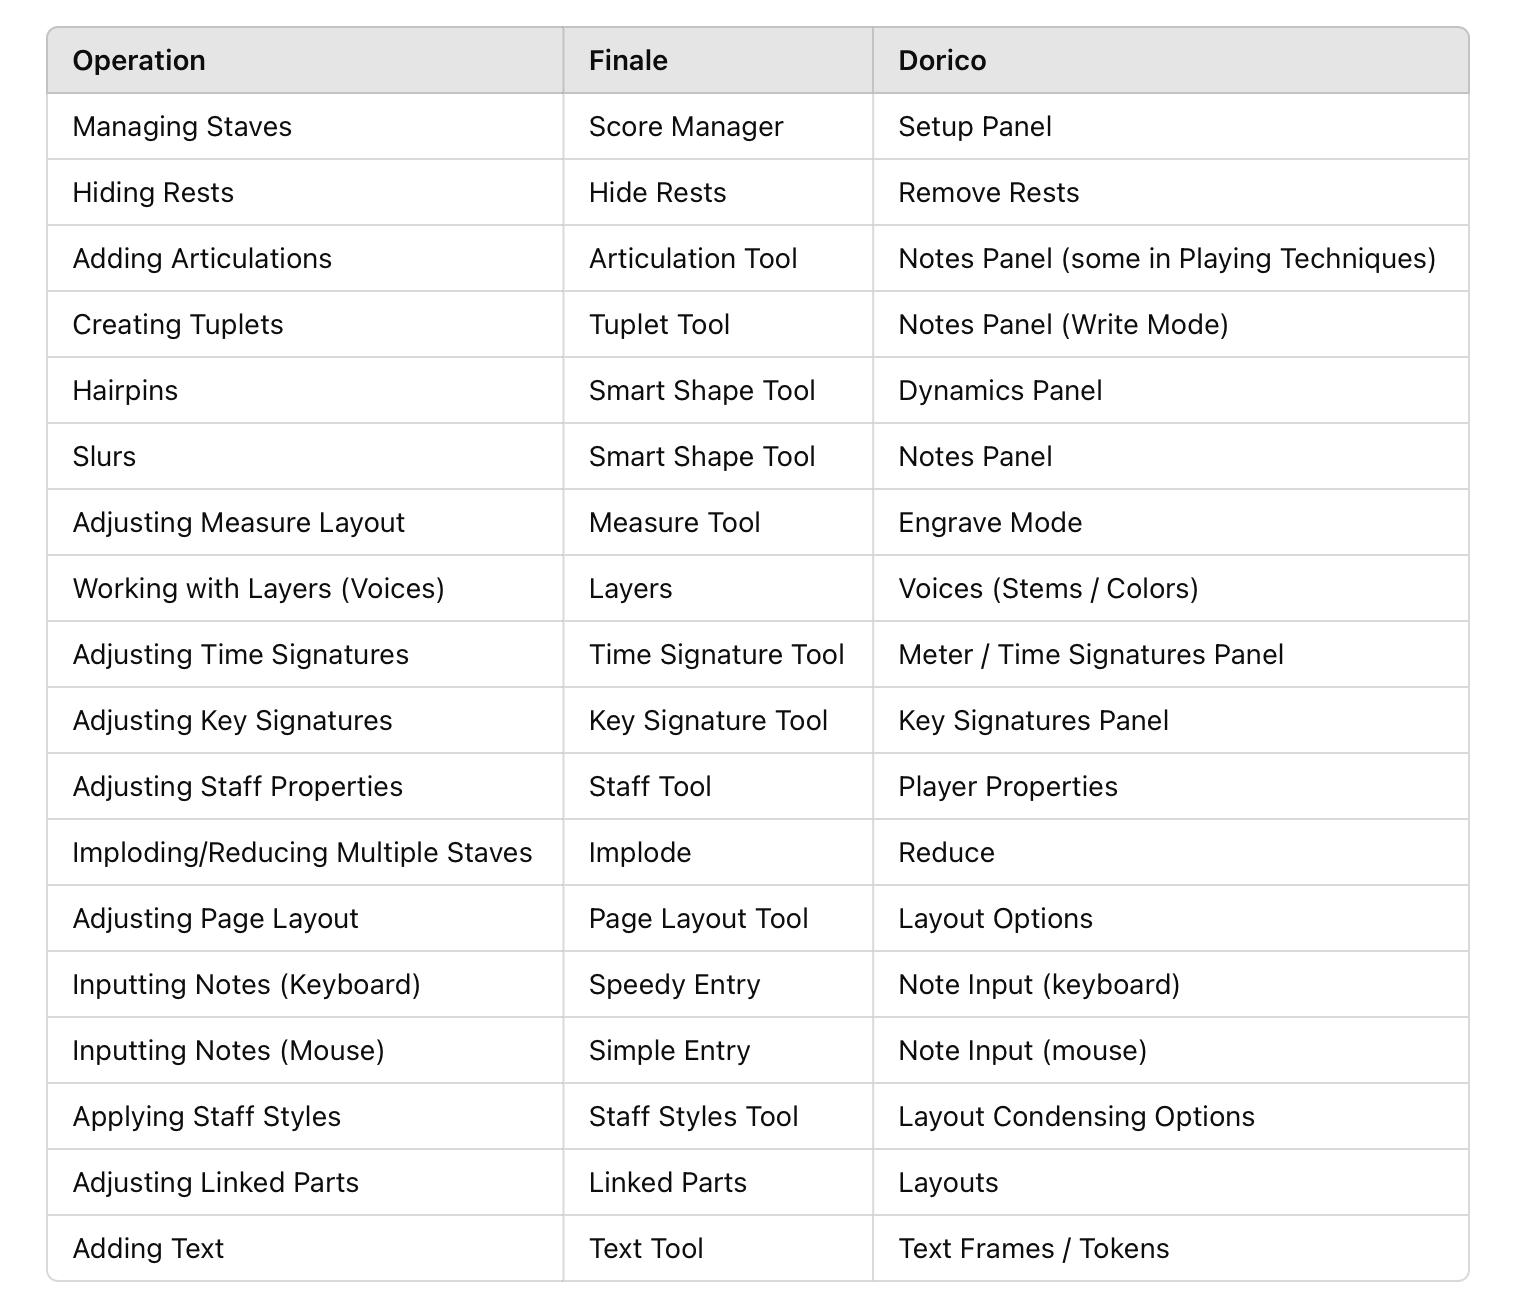
Table of Contents
Setup
To start with, we went to the Dorico Hub (= the window that opens when you start the program, which you can also revisit from the Window menu), clicked “Create New,” which opened another view in the Hub with a list of templates on the left. We chose “Big Band,” which loaded with default HALion Sonic instruments.
The first thing I wanted to do after loading Dorico’s Big Band template and bringing in the XML of my small band scoreA written representation of a piece of music, including the notation for all parts of an ensemble. was to find better sounds. Garritan’s JABB is useful for big band, with all of its samples for mutes and playing techniques.
There’s a post on the Dorico blog loaded with Playback Templates for various libraries, including one for JABB. The directions said to download it, unzip it, and drag it onto the Dorico Hub to install it. After that, we loaded the template “Garritan JABB.doricopt” by going to Play>Playback Template and selecting it from the list, causing all the Players to use JABB sounds. A look in Play>Track Inspector showed the Aria Player with the sound loaded, and clicking next to “Ex. Map” revealed its Expression Map, with Dorico techniques mapped to keyThe group of pitches, or tonality, that a piece of music is centered around. switches and controllers, all ready to go, like Human Playback in Finale, but with more access to features and edit-ability.
It’s a kind gesture and extra effort on Dorico’s part to post these templates for their competitions’ libraries, showing their openness to the needs of their users, along with their determination to make effort to be the best notationA system of symbols used to write down music. app on the market.
“Expression Maps” ≅ “Human Playback”
Why do we need Expression Maps in Dorico? Dorico sends Playback Techniques data through Expression Maps to control playback parameters. Finale’s Human Playback parses Expressions with Text Recognition, and a dialog full of configurable Human Playback Preferences. In Dorico, “Playing Techniques” pass data through the Expression Map to the player. This data includes Articulations, other markings, volumeThe perceived loudness of a sound, determined by its amplitude., pitchThe perceived highness or lowness of a sound, determined by the frequency of the sound wave. wheel, Expression (CC#11) sent by Playback Techniques applied to notes in Write mode. Dorico’s JABB Playback Template has all the parameters set up and accessible for editing.
Play Mode is a DAWDigital Audio Workstation. Some are: Ableton Live, FL Studio, Logic Pro X, Cubase, Pro Tools, Studio One, Reason, Reaper, Digital Performer, Bitwig Studio, Samplitude Pro X, GarageBand (Mac), Cakewalk by BandLab, Presonus Studio One, Tracktion Waveform
Dorico’s Play mode is a built-in Digital Audio Workstation that allows direct editing of notes and durations, as well as aspects of playback including CC Controller lanes, VelocityRefers to the amount of energy applied by a performer in generating a tone, and is communicated in MIDI as an attribute of a note. Sampled instruments usually contain sounds produced at varying velocities, which are mapped to MIDI velocity ranges in the sample player. A MIDI note with a higher velocity will sound as if it's performed with more energy than one with less velocity. Velocity is expressed as a number in a range of 1-127 editing, and a Tempo mapComponent in MIDI data defining the tempo and tempo changes in a musical piece or track. The expressions included in the score flow to playback automatically. Optionally, you could turn off the Expression Maps by assigning the “Default” expression map, but then Dorico playback would ignore all score markings, and you’d have to do everything yourself in the “Key Editor” in Play mode.
“Staff Sets” = “Instrument Filters”
With a big band score loaded, the first thing I wanted was to create Finale-like “Staff Sets.” Dorico has an “Instrument Filter” feature in Write mode (in Galley View) with which you can easily create “Filters” by clicking on a list of players for each one, making as many as you like. Click the little floating icon in the upper left corner – that’s how you activate them.
Applying Swing Playback to the Project
In Finale, importing XML goes into a new file. In Dorico, it goes in to another “Flow” in the same Project. This project needs jazz playback. In Dorico, you should first set the playback style globally using Library>Playback Options>Timing. In Dorico, you need to define the swing style of the project Globally. I tried setting it locally first, but it was overridden by the Global timing style and just didn’t work for a large selection in the score.
Dorico’s User Interface
Like Finale, Dorico displays menus and commands conditionally, with the added variability of right- or left- (control or alt-click) menus. For example, a different context menu might pop up depending on whether you left- or right-click an item.
The behavior of Players in Setup Mode is a good example. Each player can be right- or left-clicked, and each Player contains an Instrument with 3 dots next to it, which will display different options depending on which side of the mouse you click. (aside…each Player can have multiple Instruments assigned, which is handy for Woodwind doubles.) Options and context menus will change depending on what kind of entry is selected. Where Finale might display a popup dialog, Dorico relies on menus and nested menus, bringing up a dialog screen or command at the end. Where Finale let you select and show/hide anything in the score, Dorico has strict algorithms and often indirect means of controlling items on the page. It can be a challenge, with all the menus and options, to find out the “right way” to do something in Dorico. Searching the menus, Forum or Manual with Finale terms in mind often leads to frustration. Here are a couple of Translation tables:
Note Entry and Editing – Speedy and Simple in Dorico?
Emulating Finale
Speedy Entry vs Simple Entry
There’s a button in the Note Editor panel to toggle Pitch before Duration (triggered by the shortcut “K”). You can set a Preference to have that on or off by default when you open a project. “Pitch before Duration” is similar to Speedy Entry, except that in Finale, you strike a duration key while holding down the note, but in Dorico, you define a note with the midiA protocol for communicating musical information, such as notes and control signals, between electronic musical instruments and computers. or typewriter keyboard, which appears in the score as a ghostRefers to original composition done as work-for-hire, without credit (we do this) note, then define the duration with a keystroke afterwards, which activates the note in the score.
In Dorico, notation is dynamic, depending on their “rules” (or your preferences in Library>Notation Options>Note Groups), with entries seen as objects with a property of Duration, which Dorico notates according to its rules and algorithms. If you want Dorico to behave more like Finale, you can choose to Force Duration (O key) which causes your intended duration to appear in the score the way you enter it.
For Finale users, this aspect of Dorico is the most aggravating and frustrating at first, until they see how much time Dorico can save. You’re no longer responsible to enter every marking on the score… just point of entry and duration. Dorico takes care of the rests and ties, following the conventions and preferences you set in Library>Notation Options>Note Grouping.
You can enter “explicit rests” by pressing the comma key before a duration. (Dorico uses “implicit rests” by default, which are not “duration objects” like explicit rests).
You can’t “tieA curved line connecting two notes of the same pitch, indicating that they are to be played as a single, sustained note. backwards” with a shortcut in Dorico. You need to select both entries (exit Note Entry mode first by pressing Return, then select the adjacent entry with shift-left or shift-right) and type (T) to tie them. Dorico is designed to create ties automatically. If your excess duration is too long or too short, you can quickly modify it with
- ⌥⇧← or→ Change duration by grid value
- ⌘⌥⇧← or→ Double or Half duration
Dorico’s Strengths for Note Entry
Duration Before Pitch is Dorico’s default preference. Note entry can get really fast when toggling between the 2 modes. For example, after using Pitch Before duration to get the first note of any value into the score, and subsequent notes have the same value, toggling Pitch Before Duration replaces the Caps Lock>Duration method in Speedy to enter multiple pitches of the same duration. In Dorico, all of that is replaced just by hitting (K). An entry process that includes both methods is potentially blazing fast.
Another thing Dorico is great at is entering voicings onto multiple staves simultaneously. When starting entry, shift-arrow down or up to activate entry in additional staves.
Once you have a few notes in the score, you can select them and option-click to drop them anywhere in the score, then play with your entries with the arrow keys, modifiers, and Note Tools.
Mouse and Keyboard Entry
You can also enter notes with the mouse or computer keyboard, if that’s your prior habit. Starting at D(=D4) through C(=C5), Typing a note name gets an entry into the score, which you can then manipulate with arrow keys to change pitch, add accidentals, move to to another beat, add notes to create a voicingThe distribution of musical notes between different parts in an ensemble; the intervallic structure of a harmonic array with Note Tools (⇧I), etc.
Entering and Exiting Note Entry
You can enter and exit Note Entry mode with the Return key. If there are no entries yet, Return will activate Note Entry in the first bar. To activate it in any other bar, click in the bar first, then move the cursor with arrow keys or click at the grid point where you want to start your entry.
When you exit Note Entry, your last entry remains selected. You can do a lot if things with a selected entry.
The Caret and the Grid – One of Dorico’s greatest features
There’s a universe of edits possible with combinations of arrow and modifier keys.
You can:
Move notes horizontally:
- ⌘⌥← or→ by Grid value
- ⌥← or→ by selected note value
Move notes vertically:
- ⌥⇧↑/↓ Transpose chromatically +-
- ⌥↑/↓ Transpose diatonically +-
- ⌥⌘↑/↓ Transpose OctaveA range of eight notes, starting with a particular note and ending with the next instance of that same note, either higher or lower in pitch. +-
Control durations:
- ⌥⇧← or→ Change duration by grid value
- ⌘⌥⇧← or→ Double or Half duration
- 0 Force Duration
Relocate entries:
- ⌥-N Move to staff above
- ⌥-M Move to staff below
- ⌘⌥← or→ by Grid value
- ⌥← or→ by selected note value
⌥-click to move Selection to new click point location anywhere in the score without disturbing the surrounding content.
Respell accidentals:
- ⌥= Respell to next higher note
- ⌥ – Respell to note below
- You can create voicings with the Note Tools (also known as “Interval- describes the distance between notes, either melodically (in sequence) or harmonically (sounding at the same time, with a resultant sonority)”) popover. “⇧I” opens it, and you can type, for example, -4,3,5 to create a triad in the first inversionA melodic varian consisting of a mirrored version of a melodic array with your note at the center.
- You can create a lead line, then Lock Durations to go back over it to voice it, then explode the result into staves.
- You can select a stack of staves, and “Reduce” them into any other staff (like Finale’s implode, but the destination could be anywhere in the score. For example, if you get a request for a transpositionThe process of changing the key of a piece of music. that puts instruments out of range, you can quickly reduce and fix your voicings, then explode them back out.
- You could select all the bottom notes, for example, move them 8va, then re-explode.
- You can select particular members of chords, for a single entry, or region of entries.
- You can enter voicings into multiple staves simultaneously.
- You can change any pitch by selecting it and using the arrow keys with a modifier.
There is also a Respell Automatically function: Write>Respell>Respell Notes Automatically
There’s so many other things you can do. You can grab a motif from anywhere and quickly copy it to any location in the score without disturbing the surrounding contents. You will never ever see the “Too many beats” dialog again, and spend a lot of time cleaning up after you insert a motif.
Rests
Dorico uses “explicit” and “implicit” rests. One great thing about Dorico is you don’t have to enter rests – it provides “implicit” rests automatically for any gaps between entries. Point of entry is governed by the Grid, and whenever you put something in it, or change its duration, Dorico recalculates everything, and you don’t get an error message. If you create a duration that runs into the next entry, it overwrites subsequent entries for the duration you specify. This functionality is very different from Finale, and one of Dorico’s greatest strengths.
You can create “explicit” rests – that is, a restA symbol indicating a period of silence in a piece of music. of the duration of your choice – with the Force Duration function (O key shortcut), setting a duration for it, and typing a comma “,”.
You can control your preferences for ties and rests in Library>Notation Options.
Unwanted rests
When working with multiple voices in a staff, it’s possible that you’re going to get unwanted rests. When that happens, you can:
- Try selecting and deleting the rests
- If they are under a triplet definition, try deleting the definition (click the “3” first)
- Define the “end of the voice” they’re in before they appear using the Properties Panel
- If a new voice entering mid-bar creates unneeded rests at the beginning of the bar, select its entry note and define “Voice Start,” again in the Properties panel.
- Select them and use Edit>Remove Rests.
Transposing Instruments
With imported XML, I had some weird results on import with octave displacements in Concert Pitch view (little tab bottom left). Finale has its own way of handling octave transpositions that don’t necessarily transfer like the original score through either MIDI or XML.
For this project, I needed to change the Instrument Definitions, and did so by going to Setup>Players>Player Name>(Open dropdown arrow to show the Instrument held by the Player)>left-click the 3 little dots> Edit Instrument Definition.
Unfortunately, there’s no shortcut available to drill down to open this dialog.
Once it’s open, you can set the octave transposition for concert and transposed views.
Correct Instrument Transposition References for Big Band
- In the case of Acoustic Bass, they should both be Middle C=C3 and Bass ClefA symbol placed at the beginning of the staff that determines the pitch of the notes on the lines and spaces..
- For Bari Sax, it should be bass clef for non-transposed and treble clef for transposed, showing Middle C sounds as C4 for concert, but sounds as Eb2 for transposed.
- Alto Sax would be C4 for concert, Eb3 for transposed, same clef for both.
- I prefer to show tenor saxes in treble clef for the concert view – it gives a better sense of where they are on the horn – so the settings would be Middle C is C3 in concert view, and Bb2 in Transposed view.
- Guitar has the same settings as Bass, except using Treble Clef.
- Trumpets are Treble Clef, Middle C is C4, Transposed is Bb3.
ChordTwo or more notes played simultaneously; a group of three or more notes played or sung at the same time to create harmony. Symbols
Chord symbols are easy to customize in Dorico. As Dorico tutorials advise, “start Global and fix Local.” This is especially true with chord symbols. If you jump right into the chord symbol editor, you’re missing the most powerful feature of this function in Dorico. Find it in Library>Engraving Options>Chord Symbols. Dorico’s chord handling is vastly superior to Finale’s. Once you set your global preferences for chord display, you don’t have to worry about creating and maintaining a custom chord library, although you can if you need or want to.
Styling extensions
With these options, you can completely control the style and formatting of your chord symbols, for consistent presentation even with diverse spellings. You can just type your desired extension into the score (⇧Q to open the Popover) and the rules you set in Engraving Options will govern their appearance. Multiple spellings will yield the same symbol – for example, m7, min7, minor seventh will all yield the same symbol. If you set your default to show ø7, you can type in min7b5 and still get your chosen symbol… same with M7 or maj7, you can set any variant to show △7. if that’s the Global preference you set.
Display for players
Dorico is fundamentally different from Finale in how it handles chords. There’s a virtual “chord track” (visible above the “system track” in Play mode) that act as a reservoir for your chords. One huge advantage of this any edit to any chord will update chords showing in all other partsIndividual pieces of music, each designed to be performed by a single musician or section of an ensemble. at that same point the music.
You can define a non-rhythm section Player to show chords in Slash Regions, like for where they have a solo. Chords show automatically for all RhythmThe pattern of beats and accentuations in music, which gives a piece its sense of movement and flow. Section players by default. (You can modify those display conditions in Setup>Player>Right-click>Chord Symbols.) If you want to show chords, either turn them on globally for the player, or turn them on for Slash regions, and just create a slash region where you need it.
Any chord you enter in the score will automatically appear in all the places it’s supposed to according to the settings. Chords can be hidden locally using the Properties panel while chords are selected.
Creating Drum Parts
Structure
Drum set staves in Dorico are collections of staves condensed into one (as opposed to a staff full of sounds as in Finale). Dorico has a Drum Kit Editor, like Finale’s Percussion Maps. As far as Dorico is concerned, a drum kit is a condensed collection of separate staves, with instruments residing in either an up-stem voice or a down-stem voice. Dorico will match and condense entries for the minimum use of voices, allowing up & down stem and slash voices.
The Drum Kit Editor
The Drum Kit Editor controls which line of the staff instruments appear in the condensed drum staff. It also controls whether a particular instrument resides in an “up-stem” or “down-stem” Voice.
Voices and Rests in Drum Kits
If you see unwanted rests in your drum part, it’s because of Voice changesJazz shorthand for Chord Changes; the chord progression caused by choosing a different stem directionInstructions for an arranger or composer indicating style, instrumentation, mood, and purpose instrument, or the entry of a polyrhythm (tuplet) in the score. which automatically creates another Voice. Dorico automatically inserts rests starting at the beginning of the bar containing the first appearance of the Voice, and treats each Voice independently as far as rest creation is concerned.
To get rid of unwanted rests, you can:
- Click on the rest or rests to select them, then apply Edit>Remove Rests (simplest!). (I made a Shortcut for the command, and use it often.)
- Change the stem direction of the entry that’s triggering the rest using the Drum Kit Editor by assigning the drum sound to the opposite stem direction voice (may cause unintended appearance).
- “End the voice” of the instrument preceding the rests after its last entry by selecting the last note, and entering the Properties Panel (bottom of the window, opened with the collapse arrow in the center), and using the End Voice command.
- If you have rests stacked up and it’s hard to click the one you want, you can Filtera process that removes or reduces certain frequency ranges from an audio signal. by Voice: Select the bar by clicking in it away from any notes, then right-click and select Filter>Voice> and choose the voice where the rest is. You can find out what voice it’s in by turning on View>Colors>Show Voice Colors.
- If you’ve got rests lying around from having started triplets in one voice, then switched to another, you may need to deconstruct your drum part into individual percussion staves, find the empty rests, and delete them. Make this change in Library>Layout Options>Players>Percussion>Drum Set>Single Line Instruments. Don’t forget to change it back afterwards.
Once a Voice is created in a drum part, it will persist and display rests unless you define an endingAdditional music designed to create a sense of finality at the end of an arrangement, piece or track to the voice in the Properties editor. Select the last note of the Voice showing the rests, open the Properties tab, and select “Voice ends here.”
Note Entry in a Drum Staff
Set the grid resolutionRelease of musical tension, use the arrow keys to navigate through the 5-line staff vertically and see what the sounds are, then when you have the one you want, set the duration value and hit the “Y” key. It is also possible to enter drum sounds with either the typewriter or midi keyboard – but it takes a bit of research to find out what keys do what for note entry. I found that cursor navigation and using the grid was the easiest way for me. You could play your drum part in a similar fashion to entering chords – but you have to know the pitches to do it.
Entering triplets was tricky, at first. I found that if you define a triplet entry, then move the cursor to a different stem direction instrument, it will create rests in the original voice, and not enter triplets. You can triplet-ize your mistake after by hitting the triplet button with the first note selected, but you’ll still have a bunch of rests in the other voice. You can delete them by selecting all the entries in the other voice and hitting “delete,” or by using the Edit>Remove Rests command.
Repeat Regions (1,2, 4 bar repeats etc)
Select the bars following the bar where you establish your time pattern, hit the R key to open the RepeatsMarkings defining a section of music to be played again Popover, then type “%” followed by a number indicating the # of bars in your pattern. One really great thing about Dorico is the repeats refer back to the bar(s) preceding, and playback the content of the measures throughout the duration of the repeat bars region.
At first this seems to be a problem when also applying a Slash Region to those bars – the repeat signs show through and are not hidden by the Slash Region. There are 2 solutions to this problem. One is, get rid of the Bar Repeats and just copy the music and hide it with the Slash Region – or, better yet, to save all that recopying – before applying the Slash Region, select all the Repeat bars, open the Properties panel, then on the left set Custom ScaleA sequence of pitches organized in ascending or descending order from which a harmonic series can be derived to “1.” All the Repeat bars become invisible, but retain their playback function. Then, go ahead and put a Slash Region over it. Save time by dividing the Slash Region before bringing in Cues in order to hide the whole rests that will come in with the CueA short, simple melodic fragment played by one instrument to cue another instrument or section to enter. region. You can avoid those by defining the Slash region length to be the same length as the cue phrase you’re about to show.
Slashes
Big band drummers – jazz drummers in general, or maybe all trap drummers – like to see slashes with cues over them to see what figures the band is playing. They might not want to read the detailed entries you write in the score for your drum fill. In Dorico this is really easy. You can write your playback drum part, then cover it up with slashes, maybe leaving an essential figure exposed here and there. You can use the Scissor tool (U) in Write mode on a slash to divide a region.
Slash Voices vs Slash Regions
Your Drum Kit may or may not include a Slash Voice, but you can add it if you need it, and integrate it with other content in the drum staff. Slash Voices provide information in the score, but don’t play back. Slash Regions hide all entries in a staff, and preserve your written drum part for playback or subsequent production.
Cues
When using Slash regions, using Cues along with them helps the drummer see what’s going on in the band. Cues in general are SO easy in Dorico – just make a selection in the score, hit shift-U, and start typing the instrument name you want to show.
There is a catch, though… if you select a slash region and apply a cue to it, Dorico automatically runs the cue out for the entire length of the region, rests and all.
If you want to show a cue for another instrument, or get rid of extra rests, you can split the Slash region (as above). Click back at the beginning of the region and add the cue again, and it will only run up to the cut point. Repeat as needed for subsequent cues. You cannot hide rests in a Cue region without hiding them in the source part, but you can hide them by shortening the cue region.
Chords in Drum Parts
Note that if you’re using slash regions in a drum part, and decide to show chords using a Chord Symbol Region, they’ll show in all slash regions.
► If you plan to show chords anywhere in the drum part, you’ll save a lot of time by showing them in Slash regions (Setup>Player>Right-click>Chord Symbols [dropdown], then filter and hide them as desired. Go into Write>Layout (top bar dropdown next to “Print”))>Drums, use the System track to select everything in the bars where you want to hide chords, right-click to filter for chords, then hide the resulting selection using the command in the Properties panel.
Page Layout
Condensing
Dorico’s superpower is Condensing. From your full score, it can create condensed scores and layouts according to your specification. To condense a score after writing it, go to Layout Options>Players>Condense, select your layout, then add player groups to condense.
Dorico creates beautiful layouts that might need some editing. In Engrave Mode, there are 4 different tools with their own capabilities.
The Graphics tool
The Graphics tool makes it possible to move bars to the previous or next system, create Frame breaks for page turns, define new systems from selected bars, reset the layout, add or remove brackets, select and move individual items, or lock the layout. Anything can be moved with alt (option)-arrow, with the move in greater increments when adding the Shift key.
The Frame Tool
The Frame tool allows the creation of a new Music, Text or Graphics elements.
The Staff Spacing Tool
The Staff Spacing tool is handy when text or ledger lines make things feel a bit crowded, or stacked text makes things too spaced out.
Spacing and Slices tools
The next tool is the Note Spacing tool, then comes the Graphic Slices tool (which seems redundant, given you can do very similar things with a screenshot).
To navigate to the next part: ⌥⇧] Next Layout (Engrave Mode)
Drums not condensed?
I found that my drum part was displaying as individual staves for each instrument in the kit (possibly because I had disassembled and reassembled it multiple times using Layout Options>Players>Percussion>[select singe line or 5-line] in the Score trying to clean up extra rests). The fix was to return to that setting and select 5-line, this time with the Drum layout active. The drum part condensing is handled here rather than the Condensing function in Layout Options. for the score or other layouts.
Printing
► Set the page size for layouts in Layout Options>Page Setup.
There’s a list of layouts on the right – select the ones you want to configure and choose the page size option you want.
If you’re exporting to file (pdf), use “Graphics” as the Destination, and it will use your chosen page size(s) for the pdf.
If you want a tabloid score and letter parts as 2-ups on tabloid paper, you can do that. First set up the Page Sizes in Layout Options. Then, in the Print section, choose Graphics as the destination
For the score – Select Full Score Layout in the left panel. Job Type Normal, Page Setup Portrait. It will automatically generate an 11x17or US Letter pdf, depending on the preference you set.
For the parts, select all parts on the left, then Select Job Type>dropdown>2-up, Page Setup: Landscape. Once again, it automatically generates side-by-side US letter layouts on tabloid page size. You don’t need to mess with the system page setup or print dialog at all.
When using Staples for print output, I like to make a singe pdf out of all the files (of the same paper size) and print everything in one run. I use Acrobat Proacronym short for Publishing Rights Organization, such as ASCAP, BMI, SESAC to combine all the files into one, although there are a lot of other options to do this. You could also leave them all separate and print the whole folder at Staples.


Share your thoughts!