If you’re learning an instrument (the lifelong condition of any musician), or looking to add repertoire, or want to develop a musical services sideline like we have, learning how to transcribe music is an essential skill and valuable educational tool.
EDITOR’S NOTEa symbol used to represent a specific pitch and duration: This article is featured on the official Seventh String Software Resources page as a practical guide for professional transcriptionThe process of notating a piece of music as it is performed, either by ear or from a recording. workflows.
Get Transcribe! transcription software
We recommend Transcribe! by Seventh String Software. It’s reasonably priced – and given its extensive feature set, a steal, actually.
After many years using the free Audacity app, we encountered some of its limitations – mainly:
- Location label contents need to be typed in
- Labels are associated with the interface, rather than exact locations in a sound file, and become disassociated when the file is processed to a slower tempoThe speed at which a piece of music is performed, often indicated in beats per minute.
- Changing tempo requires separate processing via an Effects"Effects" refer to changes to the sound using digital signal processing ("DSP"). Common effects include reverb, compression, delay, distortion, stereo field, noise reduction, and a host of other possible applications. operation.
Transcribe solves these issues:
- Flexible tempo change tools with a wide variety of adjustments and ready-made presets
- Auto-numbering of barA line that separates measures in sheet music. markers
- Markers are SMPTE-coded to the underlying wave formThe structure or organization of a piece of music, including its sections, repetitions, and overall shape., so they stay with the music when the tempo changesJazz shorthand for Chord Changes; the chord progression
- Many methods of navigation of your track are instantly available
- Built-in Audio to MidiA protocol for communicating musical information, such as notes and control signals, between electronic musical instruments and computers. tools for enhanced pitchThe perceived highness or lowness of a sound, determined by the frequency of the sound wave. identification
- Support for Video files as well as audio
- Other features such as effects and audio processing
Get:
- Transcribe (√) (or Audacity or any DAWDigital Audio Workstation. Some are: Ableton Live, FL Studio, Logic Pro X, Cubase, Pro Tools, Studio One, Reason, Reaper, Digital Performer, Bitwig Studio, Samplitude Pro X, GarageBand (Mac), Cakewalk by BandLab, Presonus Studio One, Tracktion Waveform such as Garage Band, Cubase, Proacronym short for Publishing Rights Organization, such as ASCAP, BMI, SESAC Tools. Logic, etc)
- A sample player or keyboard app (not needed with Garage Band and other DAWs)
- A midi keyboard with a built-in midi interface (we use an Oxygen 61)
- A music notebook (optional)
- A fine-point pencil and an eraser. (optional, but helpful if you’re new at notationA system of symbols used to write down music. software)
Some passages may require transcription with pencil and paper prior to entry, although these days we rarely use pencil and paper, having switched to Dorico, which makes it easy to modify entries after the fact and correct on-the-fly.
Working Outside In, Bottom to Top
Regardless of tools (paper vs computer), where do I start, you might ask?
Our process involves working from the outside in, bottom to top (or top first) – get the melodyA sequence of single pitches perceived as a unit, usually the main theme or tune in a piece of music. and bass line into your sketch or scoreA written representation of a piece of music, including the notation for all parts of an ensemble. before anything else. Next, identify and add the prominent countermelodyAn element of an arrangement adding a sense of commentary and completion in complement to a melody (or melodies – but there’s usually one that’s most prominent.) Next, identify the chords, or harmonic environment, and get them into the sketch. Sometimes the top line of the chordTwo or more notes played simultaneously; a group of three or more notes played or sung at the same time to create harmony. background functions as another countermelody. As you go through this process, you’ll begin to gain confidence in your ability to trace the activity (or the “through line,” in other words) of each element, and you’ll be amazed at what you’ve done once it’s all in the score.
Are Audio to MIDI tools reliable?
Midi-to-audio conversion creates results that require the same kinds of decisions and selectivity you need for aural transcription. You’ll see harmonicsOvertones that are present in a sound, which contribute to its timbre. and resultant tones in the midi result. In Transcribe, you’ll get useful hints as to which notes have the strongest presence, and are more likely the correct choices – but, you’re still making the choices – not the software.
With Transcribe and other tools, navigating your sound file, repeating sections, and slowing sections down without changing pitch make it relatively straightforward to identify pitches. Polyphonic sounds such as chords and voicings can be more challenging, but it’s possible to get very close using loop playback and comparison with your keyboard – and you can view likely pitch candidates in the Transcribe interface.
Rhythmic notation can be more of a challenge, being the most likely thing to require use of pencil and paper. We often make note stemsIndividual tracks extracted or exported from a mix as individual sound files, counting the attacks in a given duration, then organizing the beat divisions with beams and tuplets, then transcribe it into software.
Transcribe Handy Starter Shortcuts
Transcribe Speed Shortcuts
- ⌘ 1 – 100%
- ⌘ 2 – 50%
- ⌘ 3 – 35%
- ⌘ 4 – 25%
► Note that these are customizable in Transcribe!.
Transcribe Navigation Shortcuts – quick reference
- Spacebar – start/stop.
Pressing the spacebar again rewinds to the “Current Point” (start mark, shown as the red triangle) before resuming play - E – Move Current Point to the cursor (playback line, or “selection” in Transcribe! terms) position. This resets the starting point to where you just stopped
- Hold R to scrub backward
- Hold C to scrub forward
- R – Resume playback with no rewind
- [ skips back to the Current Point, then nudges it to the left
- ] moves the cursor to the right
- Z for playback while held (rewind to Current Point on releaseFollowing the building of tension, arrival at a resolution. In England, is synonymous with "bridge")
- ; for Pause/resume (restarts from your stop point without resetting the Current Point)
- M drops a measureA unit of musical time, defined by a specific number of beats. marker, auto-numbered
- S drops in a Section Marker
- B drops in a Beat Marker
- ⌘[ or ⌘] go to previous or next Measure marker
- ⌥[ go to previous Section marker, ⌥] to skip to the next.
Transcribe Operation tips
Markers – Measures, Beats and Sections
Section markers are variants of measure markers, and also function as measure markers. You can add them as you go, or convert Measure Markers into Section Markers later. ► If you add them in addition to your existing measure numbers, it’ll screw up your measure numbering sequenceArray of musical notes in a repeating pattern.
The program is so useful for a number of user situations, we hesitate to suggest a workflow – but for music transcription into score, we found that mapping the measures by tapping M during playback is a good starting point.
- You can then define beats per bar. The program will auto-populate all following measures with the same number of beats by default.
- You can then edit the beats per bar if you have changing time signatures.
After your bar/beat map is set up, it works well to convert some Measure markers to Section Marks to identify sections, in order to take advantage of various navigation commands, if (for example) you need to go back to the start of the section to follow another voice through to get it into the score.
Using a Pedal or other input when Transcribe is in the Background
Transcribe! offers support for various kinds of pedals, and/or shortcuts coming in from other devices or apps. Created by a guitarist, for the benefit of other guitarists to help them learn partsIndividual pieces of music, each designed to be performed by a single musician or section of an ensemble. from recordings, the pedal features were designed so guitarists could run the app hands-free and keep their hands on the guitar. It has great potential for use by notation transcribers as well.
Using Transcribe! as a background app while doing entry in Notation software presents some interesting challenges getting pedal data into Transcribe! when it’s not in the foreground, and requires a bit of figuring out on the part of the user – hopefully this article will be of some help.
By default, Transcribe!’s pedal setup tools assume Transcribe is going to be used as the foreground app, so its tools (Transcribe>Keyboard Shortcuts>Quick Setup for Pedals which Pretend to be Keyboards) create local shortcuts by default… that is, shortcuts that pertain only to Transcribe, and only when it’s in the foreground. Luckily, Transcribe! also supports the creation global shortcuts, which it can receive while it’s running in the background – but, you have to create them yourself.
When you use the Quick Setup and press your pedals, you’ll see the new shortcuts added – and you’ll see what shortcut was used to create them. It’s an automatic setup, but you won’t necessarily be using it, except to find out what shortcut the pedal is sending. If you’ve set your pedal up, programming its shortcut output intentionally with an app like StreamDeck, you’ll already know what they are.
Setting up the StreamDeck Pedal
We chose the Elgato StreamDeck pedal in order to be able to customize the pedal’s output and control its app focus, and find it to be the best solution with Dorico software.
- First drag Hotkeys from the right in the System section onto the pedal icons on the left side, and name them if you want
- Assign a shortcut to the pedal – (try to make sure it’s unused by your Notation app.)

Next, make Transcribe the active app for your pedal profile (Preferences>Profiles>Application [dropdown]) for your Streamdeck profile definition. ► This will not make Transcribe! the active app instead of Dorico – it just means that the shortcuts will be sent directly to Transcribe!.
Setting up Pedal Actions in Transcribe! for Use in Notation
► ► Note! – in order to run Transcribe! in the background with notation software, you need to create Global Shortcuts.◀︎◀︎
In Transcribe!’s shortcut setup dialog, function commands are organized into categories, and there’s a lot of individual commands in each category. It can take a bit of work finding the one that does what you’re looking for. There’s a hint in the function names presented in this article as to which list they’re in – the first part of the term name tells you which list it’s in (most of the time…)
Setting up shortcuts in Transcribe! can be a little confusing – all of the possible actions are listed in code-like function names, and it takes a bit to figure out which ones are which, and which do what you want or need. For our use, we set the Pedal to output F5, F6, and F7, and set them as follows, from left to right.
Our desired pedal actions
- Left pedal: Audible scroll-back rewind, and stop there with a new Current Point
- Center pedal: Spacebar, stop on next press, then rewind to the current starting point on next press
- Right pedal: Advance to the next measure and move the Current Point there.
Transcribe! terms for those functions, applied in Shortcuts
| Pedal / (KeyThe group of pitches, or tonality, that a piece of music is centered around.) | Press Action | Release Action | The Workflow Result |
|---|---|---|---|
| Left (Global:F5) | PlayScrubBackwardsContinue | SelectionMakeZero | Audible “tape rewind” that anchors the start point exactly where you let go. |
| Middle (Global:F6) | PlaySpacebar | (None) | Standard Play/Stop. If stopped, it jumps back to the last “anchored” point. |
| Right (Global:F7) | SelectionMoveRightMeasure | SelectionMakeZero | Skips the playhead forward by one bar and instantly sets it as the new start point. |
Here’s how our shortcut list looks in Transcribe!’s Shortcut Editor (note we’ve added quite a few, but these are on the list)
There are other very useful navigation functions that can be passed through while your notation app is in the front, as keyboard shortcuts – as long as
- They’re set up as global shortcuts in Transcribe
- They’re not in use by the front app.
If you’re also using a scripting app like Keyboard Maestro (or a Streamdeck device), you can create a series of controls in an independent user interface, such as a Keyboard Maestro Palette, or a Streamdeck button device. This effectively gives you a dedicated, custom user interface for your transcription tools, independent of the software currently in the foreground. Below are a few examples, limited to Keyboard Maestro.
We’ve started by creating a Macro Group, active in Dorico and Transcribe!, set to display as a palette so they remain visible. You can show the macro title, a shortcut for the action itself, or even a custom icon for it if you prefer.
Our Keyboard Maestro Macros
(just a few to start with)
Loop the most recent playback and set playback speed to 50%
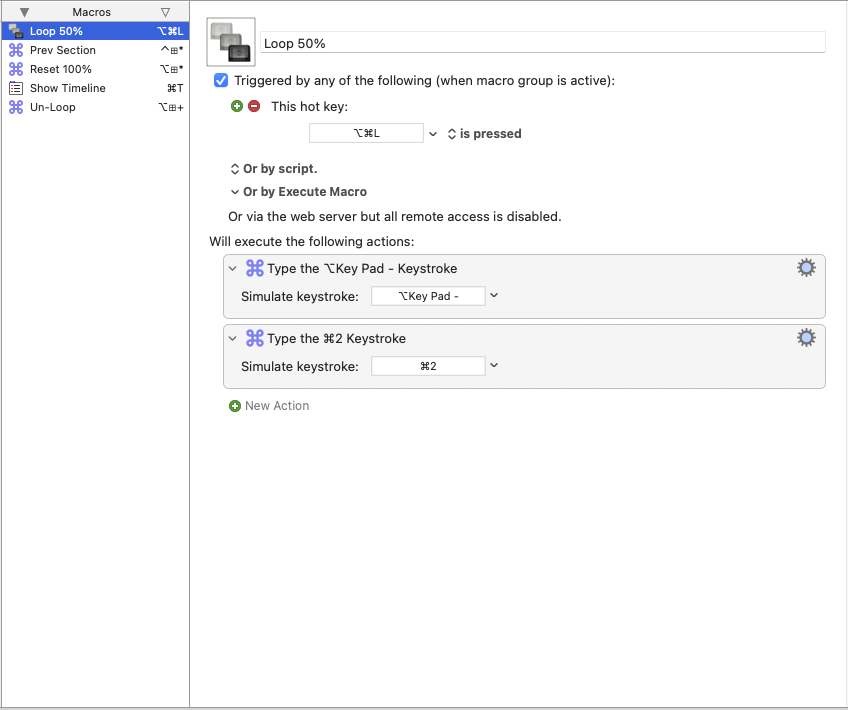
This passes through to Transcribe! when it has a shortcut configured like this:
| Gesture | Transcribe! Command | The Result |
|---|---|---|
| Press (Numpad Option -) | SelectionFromCurrent | Instantly creates a selection area starting at the playhead. |
| Release | PlayLoopOn | Engages looping mode so the selection repeatsMarkings defining a section of music to be played again immediately on next play |
Release the loop and restore playback to 100%

And again, in Transcribe!’s shortcut setup:
| Gesture | Transcribe! Command | The Result |
|---|---|---|
| Press (Numpad Option +) | SelectionCollapseLeft | Collapses the active selection to its leftmost point (the start). |
| Release | (None) | Clears the “loop” state by removing the selection area. |
Rewind back to the previous section and set the Current Point to it

Once again, in Transcribe!’s shortcut editor:
| Gesture | Transcribe! Command | The Result |
|---|---|---|
| Press (Numpad Option =) | SelectionMoveLeftSection | Jumps the playhead back to the previous Section Marker. |
| Release | SelectionMakeZero | Instantly anchors the “Current Point” (red triangle) to this new location. |
Proceeding on as we work with it some more, this is the current state of our Keyboard Maestro Transcribe Controller palette –

In Keyboard Maestro, we set this macro group to be active in both Dorico and Transcribe. These were set up (mostly) as Keypad shortcuts in Transcribe!, with an Option key added to the trigger in Keyboard Maestro to prevent conflicts when it’s used when Transcribe is active.
Automation can be very helpful in setting up a transcription workflow to ease ergonomic load and increase productivity. Let us know if you’d be interested in a tutorial on setting this up – just hit the site contact form.


